Sandbox editor
To be able to test different configurations, I had a rudimentary text-based file format to describe levels in. It was fairly simple and easy to edit, but still, hand-typing coordinates is not my idea of fun. It was time to build a graphical editor.
I plan to release the editor at some point, maybe at the same time as the game. Hence, the editor must be easy to use for a novice. Using obscure keystroke commands was not an option: I needed a GUI, with buttons and toolbars and sliders and all that.
The general recommendation in software land is not to reinvent the wheel, so I googled for OpenGL GUI libraries. It seems that this particular wheel has been invented many times over, with varying degrees of roundness:
- Crazy Eddie’s GUI System (CEGUI) doesn’t sound so great from the name. It is suitably licensed (MIT license), but various sources around the web suggest that its API is inconsistent and that it’s bloated. The dependence on the Perl regex engine definitely suggests so.
- LibUFO uses CSS and XUL to describe its GUIs, which also sounds more bloated than I need. The screenshots don’t look very impressive. It is also LGPL-licensed, which prohibits static linking. Not a huge deal, but a bit annoying.
- Bram Stein’s OpenGL GUI library for games. He never bothered to give the project a proper name, and in fact doesn’t bother maintaining it anymore, either.
- GLUI hasn’t been updated in four years. Furthermore, it does not seem to allow custom rendering, so all controls will look almost-but-not-quite-Windows-95-style ugly.
- GLGooey has not been updated since 2004.
- Guichan is conveniently BSD-licensed, and seems like the best fit. Documentation, however, seems to be lacking.
Again, do not reinvent the wheel – unless you want to learn more about wheels. Why waste time choosing a GUI library that is not quite right, then hacking it into shape, if I can waste time writing my own instead? After all, all I need for now are some buttons and sliders.
For my own ad-hoc GUI system, I drew some inspiration from Microsoft’s WPF, in the sense that it consists of lightweight, single-purpose controls. For example, a button with an image and some text would consist of a button control with two child controls, one for the image and one for the text. This modular design would provide me with some flexibility, which is needed because I don’t know what tasks the GUI will eventually have to perform.
I started implementing a simple hierarchy of parent and controls. Then I added mouse event handling and routing, and implemented a button, image and container control. I used these to build a toolbar and started coding the actions behind the tools.
A week and a half later, most of the editor was up and running. I call this the “sandbox editor” because the simulation is actually running while you’re editing it. For example, if you move a wall around, you’ll see the immediate effect that it has on the fluid flow.
The test level, that I’d manually written in a text file, could now be edited:
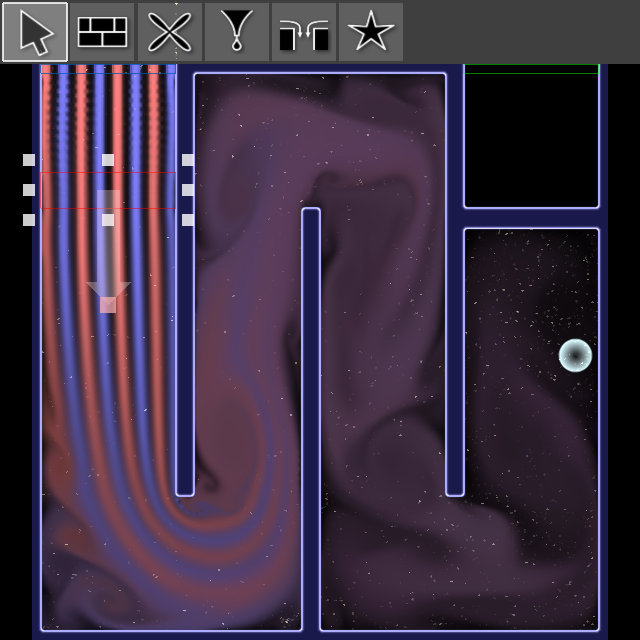
At the top left are some colour injectors that inject pink and blue paint into the fluid. The red box represents a force field, which accelerates the fluid downwards. In this screenshot, the force field is selected: you can see its resize grips and the direction of its force. The blueish ball to the right is an experimental object that floats inside the fluid and follows its motion.
The same level after some modifications:
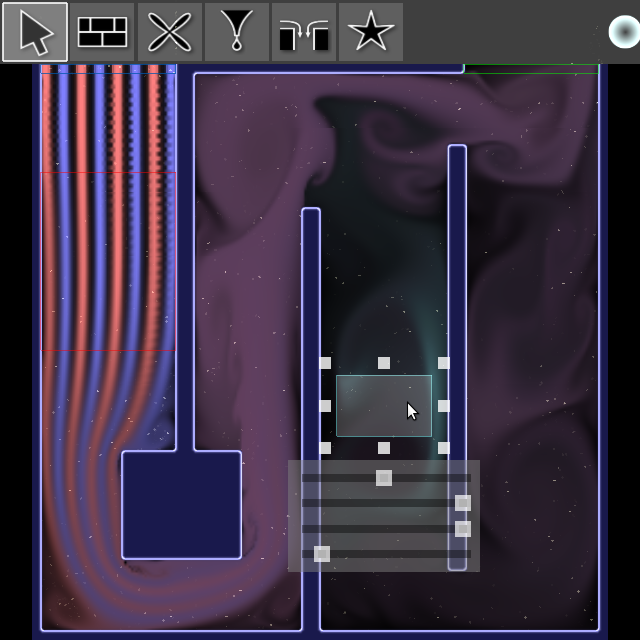
I stretched the force field and reduced its strength, moved and reshaped the walls, and added another colour injector. It is selected, so you can see the sliders below it that control the colour and amount. None of the controls are properly labeled yet, and there are several glitches – even though the editor is intended for use by players, that doesn’t mean I have to add everything at once!