The Great Fire postmortem, part 2/2
This is the second part of this postmortem. Catch up on the first part here.
Sunday morning: controls and gameplay
We have fire, we have buckets of water, we can get the buckets to the fire… now what? Throw ’em, of course! So if a peep in state PASSING sees that its destination cell is not manned, but rather flammable, it will throw the water onto the fire. (It will also do this if there is no fire. I played with the thought of keeping houses wet to prevent them from catching fire, but didn’t get round to implementing this.)
The throw animation is similar to the bucket-passing animation: simply move the bucket in the direction of the destination tile. However, it moves a lot faster to make it look like it’s being thrown. Also, the bucket is rotated in the direction of movement.
When the bucket reaches the edge of the tile, the peep destroys it and emits a throwing signal that the level_base.gd script listens for. Upon receiving this signal, a water animation sprite is added to the objects node, and the fire in the tile (if any) has its size reduced by 1.
I also changed the control scheme slightly, to allow the player to arbitrarily change the direction in which peeps pass buckets. This meant that changes are no longer triggered by dragging on a tile, but by dragging from one tile to the next. At the moment the mouse cursor crosses the border between two tiles, the destination of the source tile is set to the target tile, and peeps are summoned as described before. This allows for any change in bucket routing.
Unfortunately, it doesn’t allow the player to liberate peeps for deploying them elsewhere. Clicking or dragging with the right mouse button might have been a logical gesture for this, but I wanted this to be workable on mobile devices as well, so I went with the slightly unintuitive “drag from unmanned cells into manned cells” instead. It’s not great, but it works well once you understand it.
Now I had an actual game! While playtesting, I quickly realised that it had a major flaw: either you need to start off with a huge number of available peeps, or you lose quickly when the fire outgrows your tiny army. My quick and dirty solution was to add some windows to the houses:

A house with light behind its windows contains one peep. As soon as the house catches fire, the peep runs outside and is available for the player to deploy in fighting said fire. This works well, because it gives me a way to control difficulty by balancing the number of occupied and unoccupied houses. (I didn’t do much of such balancing, so in the later levels, all houses are occupied.) Also, the new peep is spawned close to the location where it’s likely to be needed, leading to a minimum of player frustration.
Sunday afternoon: chrome and polish
By “chrome” I mean all the window dressing that isn’t part of the game proper, but is needed anyway. Things like menus, intros, game-over screens, level switchers and a HUD.
The first step was to detect when all fires were put out, and throw up a win screen. By counting how much of the houses were still standing, I could even assign a score. High scores are being kept in a simple INI-like file, read and written by Godot’s built-in ConfigFile class.
On the win screen, I put a “next level” button, so I had to make sure there actually was a next level. While I was at it, I also put level switching buttons on the main game screen. I didn’t bother locking future levels, because any level can be completed (albeit with a terrible score) just by waiting for the entire city to burn down.
I also added a pause button. I don’t usually bother with this during game jams, but in this case, I saw it as a core gameplay feature. It gives the player a chance to catch their breath, and give new instructions to their peeps at leisure. Adding pause functionality was a learning opportunity for me, but Godot’s built-in pause functionality turned out to be exactly what I needed. You can simply tell the entire scene tree to pause and unpause. Each individual node can be configured to be processed or not while the tree is paused, so fire stops spreading and your peeps stop moving, but the GUI continues to be responsive.
This was also when the intro text was added. Godot’s built-in AnimationPlayer is absolutely wonderful for making and tweaking these sorts of transitions. Any property can be animated, including user-defined ones. Animations can call functions on cue. And all this is going to get even better in the 3.1 release.
Polishing peeps
So far, I’d used only one, static sprite for peeps:

This was in the category of “good enough for now, maybe polish later”. I should have done sound effects first, but I’m always a bit hesitant because I’m inexperienced with them (and hate Audacity), so I wanted to improve the way the peeps look and feel.
I started by splitting them into a head and a body, and colouring the body grey:

By modulating (multiplying) the body with another colour, I could achieve a varied looking population with very little effort. For more variation, I also added a second head shape, based on what a quick Google image search led me to believe was appropriate headwear for women in 17th century London:

I didn’t bother with a separate body sprite for women, figuring that the generic coat was sufficiently unisex. And finally, I duplicated all these and used them as a basis for sprites facing left, right and up:
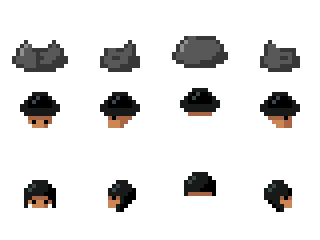
It’s worth noting that all these sprites are still 16×16 pixels, so I can just put them directly on top of each other without having to bother with positioning and alignment.
Implementing all these sprites in the game was easy, because peep.tscn was already its own scene, decoupled from the rest of the code. So I could just add a body and head sprite node, as well as a set_direction function to point the peep left, right, up or down.
A slight difficulty arose with the orientation of peeps passing buckets: I wanted them to pass buckets from side to side (left to right), but didn’t want them to stand with their back to the player and obscure the water buckets. My current solution for this isn’t perfect, and will sometimes cause peeps to stand clumsily with their back to the peep who’s passing them a bucket. But it’s good enough. I also added an offset so that peeps would stand back slightly, and pass buckets in front of them rather than through the middle of their sprite.
Then for the final sprite, the star of the show, these 4 pixels:

The peeps’ hands are actually two separate sprite nodes, and they’re being moved around depending on the state the peep is in:
- Panicking peeps wave their hands in the air with opposite phase: both hands go inwards and outwards at the same time.
- Cheering peeps (when you have won) do similar, but in phase: their hands go left and right at the same time.
- Peeps heading to their post, or waiting for a bucket, have their hands at their sides.
- Peeps holding a bucket have their hands positioned slightly above the bucket.
All this is rather hacky, last-minute code, but we were nearing the last minute, so this was entirely allowed. Fun fact: to hide the right hand when the peep is facing left and vice versa, I don’t call hide(), because that would mean I have to remember to call show() again later on. Instead, I simply set its position to 99999, 99999 so the hand is drawn offscreen.
Tutorial
I realised that the control scheme wasn’t extremely intuitive, and would need some explanation. What better way to convey this than having people learn while playing the first level? So I drew some arrows and slapped them onto a separate bunch of tile maps, which are only present in level_01.tscn:
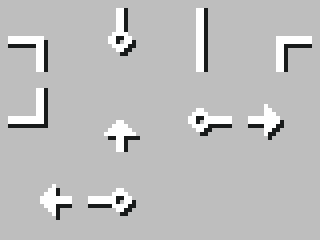
The way the game detects when to proceed to the next tutorial instruction is rather horrible. It checks after every drag operation whether this ended up in a tile containing a tutorial arrowhead. These arrowheads don’t have consistent naming, so it’s just a hardcoded list of tile names and directions:
match [tile_name, to_cell.coord - from_cell.coord]:
    ['tutorial_5', Vector2(0, -1)], ['tutorial_7', Vector2(1, 0)], ['tutorial_8', Vector2(-1, 0)]:
        tutorials.pop_front().queue_free()
        $tutorial_timer.start()
This system is probably broken in a fair number of ways, but as long as the player does as they’re told, they won’t notice. And if they do differently, they probably already know how to play anyway.
Sunday evening: sound effects and tutorial
Less than two hours to go until the deadline, and the game was still completely silent. I let a mute game happen to me last time, but not again! Unfortunately I lack even a basic standalone microphone, so I used the mic in my webcam to record everything.
The fun part was, of course, the yelling voices. Six variants of “aaah” for panicking peeps (three of which contributed by my girlfriend, but I didn’t deem this enough of a contribution to switch to the “team” category), and several “fire!“s for peeps being driven out of their house by the fire. I used the Equalize filter in Audacity to cut the bass tones, which gives these sounds a more “outdoors” quality. In the Godot engine, I randomly changed the pitch plus or minus 20% to get some extra variety.
The alarm bell sound was made by hitting a steel pot lid with a wooden spoon. It was difficult to make this loud enough while preventing clipping. I tried with a Compressor filter, but that didn’t help much. But the perfect is the enemy of the good enough, so I moved on.
The splashing sound was just me making funny noises, with the pitch shifted down to more closely resemble a bucket full of water rather than a mouth full of tongue and saliva (you’re welcome).
The hissing sound that you get when water hits fire (actually, come to think of it, also when hitting a non-burning house…) involved actual fire to make. I heated up an empty pan on the stove, carried it over to the webcam on my desk, and poured cold water into it to make it sizzle. It didn’t sound nearly the way I had imagined, but with some more pitch shifting I think it turned out quite well.
The crackling sound that the fire makes is just me crumpling up a page from a newspaper. In context, it’s surprisingly effective. To make it loop, I didn’t even bother to do any kind of crossfade; it turned out that the loop point in a sound full of clicks, pops and crackle is undetectable anyway. In the engine, this sound is continuously looped, but its volume is changed based on how much fire there is on the screen.
Finally, two of the sounds were created entirely inside the computer. The “ta-daa” sound you hear when you win a level was made in LMMS. It’s just a C major chord played over two octaves on a brass-like synthesizer instrument.
For the music that plays during the intro, I was orinigally looking for a moody droning instrument. But while browsing the LMMS instrument library, I found this deep bell sound that seemed fitting. I started experimenting with simple melodies, and soon it clicked: it had to play the Westminster Quarters. This is the melody played every hour, on the hour, by Big Ben in London. Admittedly, the tune hadn’t been written yet in 1666, but I’ll allow for this anachronism for the sake of awesomeness.
And that’s it!
This has turned into a pretty long read, but I hope it’s given you an idea of what went into making The Great Fire. And maybe you even learned something. I certainly did!